(Unlock Your Neck and Escape the Fretboard Fog Forever)
That’s not hype—it’s a practice philosophy.
If you’re tired of chasing tabs, blanking out during solos, or fumbling around scale patterns with zero idea where the sweet notes live—listen close:
🎯 Visualizing guitar fretboard notes is the single most powerful skill you can develop.
Not learning another box shape. Not downloading 100 more tabs.
This.
And in this post, I’ll walk you through seven no-fluff steps to build true fretboard vision—plus a sneak peek at the tools top guitarists are using to master the neck fast.
So pour a fresh cup. Let’s decode the fretboard.
Why Visualizing Guitar Fretboard Notes Matters
There are 12 notes in music…
And over 120 places to play them on the guitar.
That’s a recipe for chaos—unless you can see the neck like a map.
This isn’t about brute memorization. It’s about mental clarity.
When you start visualizing guitar fretboard notes:
- 🎸 You build chords on the fly
- 🎸 You solo with direction
- 🎸 You improvise without fear
- 🎸 You stop sounding like everyone else
🧠 Think like a cartographer—not a wanderer.

❌ Stop Guessing. Start Shredding.
If you’re still fumbling through scale patterns and box shapes… it’s costing you progress.
FretDeck™ is the no-fluff system that shows you exactly how to master the fretboard—fast. Early access.
⚡️ This isn’t for dabblers. It’s for players who want results.
👉 Click here to join the pre-launch now
Early access. Limited rewards. Don’t wait.
Step 1: Anchor Your Landmarks
Your fretboard has GPS built-in. Here’s how to lock onto it:
- Open strings (E, A, D, G, B, E)
- 5th fret (tuning checkpoint)
- 12th fret (octave anchor)
- Root notes from chords you already know
🎯 Daily Drill:
Walk each string from open to 12th fret and back—saying each note out loud. Do this for 7 days. It’ll rewire your brain.
This is how FretDeck™ students lock in note names fast—with simple anchor drills.
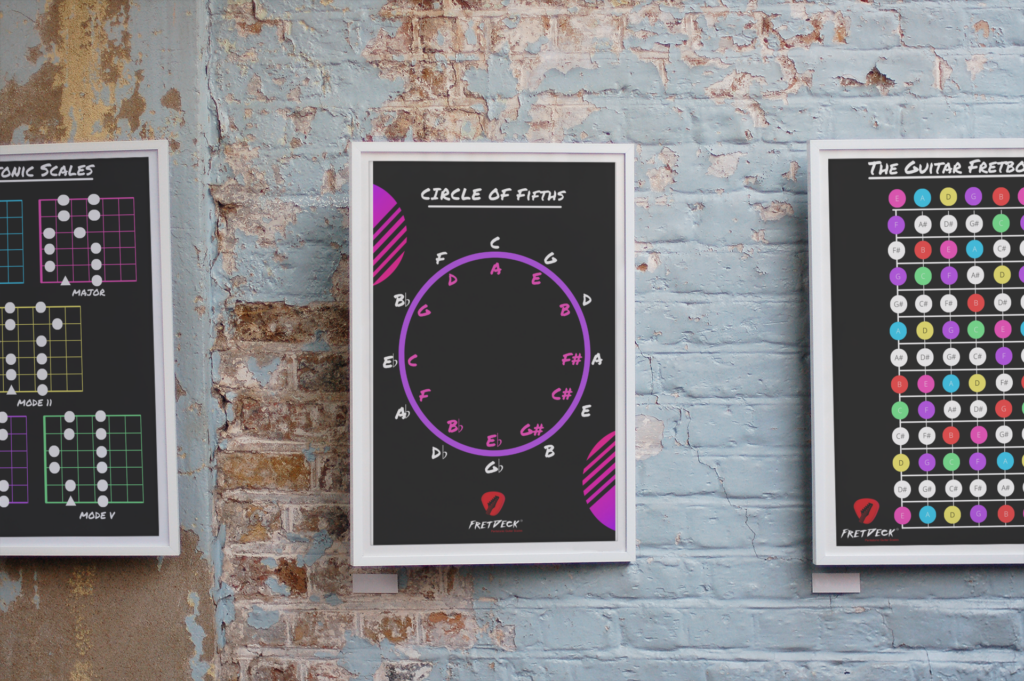
Step 2: Use the Circle of 4ths
The guitar is mostly tuned in 4ths—so visualizing in 4ths makes sense.
Here’s the Circle:
C → F → Bb → Eb → Ab → Db → Gb → B → E → A → D → G → C
🧭 Navigation Challenge:
Start on C (3rd fret A string).
Find the next note in the circle on a new string.
Say it. Play it. Map it.
✅ Bonus: FretDeck™ teaches this exact method. No fluff. Just neck mastery.
Step 3: Think Intervals, Not Just Shapes
Shapes are training wheels. Intervals are the real language of the neck.
Try this from an E note (A string, 7th fret):
- b2 = 8th fret
- M3 = D string, 6th fret
- P4 = D string, 7th fret
- P5 = D string, 9th fret
- Octave = G string, 9th fret
🎧 Feel the distance. Hear the color. See the relationship.
Step 4: Stop Looking Down
This is where most players get stuck.
If you’re always looking at your hands… you’re not visualizing.
👁 Visualization Drill:
Pick a root note (like A).
Now find it on all six strings.
Say the fret + note out loud.
Don’t look. Do it daily.
It’s brutal. And it works.
Step 5: Master the G to B String Shift
This little quirk throws off 90% of players.
Going from G to B string is a major 3rd, not a perfect 4th.
So every shape needs one-fret compensation when you cross that string.
🎯 Burn this into your mental map—it’ll save you from dozens of clams during solos.
Step 6: Map the Neck with Chords
Chords aren’t just harmony—they’re visual anchors.
Try this:
- Play F major barre chord (1st fret, low E root)
- Now find the same root on the D string
- Build a chord there
Want to level up?
🧪 Play rootless chords—start from the 3rd or 5th. Your ear gets stronger. Your vision gets clearer.
Step 7: Solo from the Inside Out
Time to apply it all.
Say you’re jamming in A minor pentatonic:
- Visualize every A on the neck
- See all 5 pentatonic patterns
- Know the intervals (R, b3, 4, 5, b7)
Now play.
🎧 Use a backing track. Solo with intention.
Land on roots and 5ths. Feel the difference.
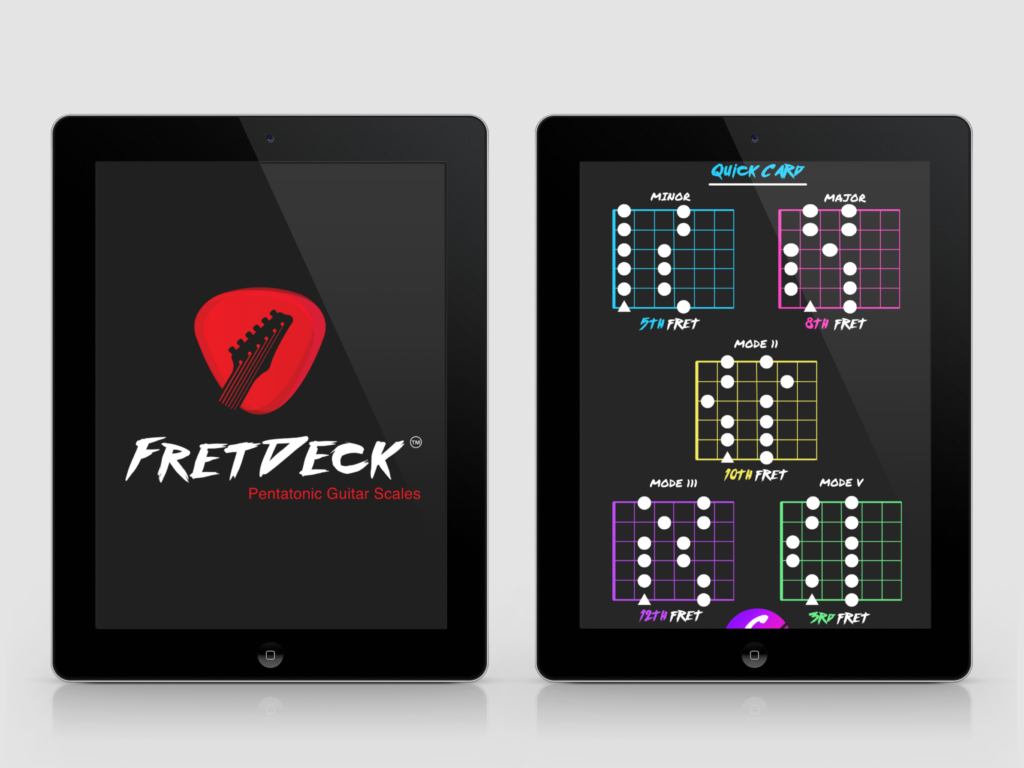
Why FretDeck Works (and Why Players Love It)
FretDeck™ isn’t just a deck of cards. It’s a system.
Each card teaches:
- A new scale shape or mode
- Interval patterns
- Root note anchors
- Circle of 4ths placement
- Finger strategy
No fluff. Just visual clarity.
🔥 Back it now on Kickstarter.
Get the deck. Get the bonuses. Start mapping the neck.
👉 Click here to join the launch »
❌ Stop Guessing. Start Shredding.
If you’re still fumbling through scale patterns and box shapes… it’s costing you progress.
FretDeck™ is the no-fluff system that shows you exactly how to master the fretboard—fast. Early access.
⚡️ This isn’t for dabblers. It’s for players who want results.
👉 Click here to join the pre-launch now
Early access. Limited rewards. Don’t wait.
🎁 Bonus: Join Guitar Freaks Hangout (Discord)
You don’t have to go it alone.
Inside the Guitar Freaks Discord, you’ll get:
- 🎸 Weekly fretboard drills
- 🎸 Theory threads & solo tips
- 🎸 Watch parties of iconic solos
- 🎸 Free e-book: Fret Logic
👥 This is where fretboard nerds become fretboard masters.
👉 Join the Discord + get Fret Logic FREE »
Join Guitar Freaks Hangout on Discord! 🎸
Get Fret Logic FREE!
Join the Guitar Freaks Hangout Discord and get exclusive access to my entire e-book, Fret Logic! Master the fretboard and elevate your solos with this comprehensive guide.
👉 Don’t miss out—join now and download your free copy!
Recap: 7 Steps to Visual Fretboard Mastery
| Step | Action |
|---|---|
| 1 | Learn anchor notes: open strings, 5th & 12th fret |
| 2 | Use the Circle of 4ths |
| 3 | Visualize intervals—not shapes |
| 4 | Train without looking |
| 5 | Adjust for the G to B shift |
| 6 | Use chord shapes and rootless voicings |
| 7 | Solo by targeting intervals and root positions |
Final Word: You Need a Map, Not a Mess
If you’ve been stuck in scale boxes and guessing games, this is your way out.
You don’t need more tabs. You need a system.
✅ Back the FretDeck™ Kickstarter
✅ Join the Guitar Freaks Hangout
✅ Master the mental map of the neck
👉 Get FretDeck now before the early bird bonuses vanish »
Related Reading:
🎸 The 5 Pentatonic Shapes You Must Know
👉 For a tried-and-true method to memorize guitar fretboard notes, check out Guitar World’s guide: “Cory Wong and Joe Satriani are right – knowing where the notes are on the guitar is a skill all players should take seriously”